👌 2022-04-01 LDAP 客户端通过 sssd 服务完成接入
FileInfo Filename - LDAP 客户端通过 sssd 服务完成接入 Version - v1.0.2203(2022/04/01 ~ 2022/04/07) Author - nuo standuke Email - shadowdoker@gmail.com DescriptionKey - LDAP client completes access through sssd service「configure LDAP client by using SSSD for authentication on CentOS」
⚠️ 注意:此次接入为基础的 LDAP 与 sssd 服务接入,不 使 用 任 何 加 密 方 式。单纯使用 LDAP 也能完成客户端接入。全程 TLS 加密见另外文章。 这部分主要讲 sssd 的认证以及缓存认证流程,所以不打算和 TLS 放在一起讲
[TOC]
简介
单纯使用 LDAP 也能完成客户端接入,可以理解为 sssd 只是中间认证插件,用于给用户更好的认证体验,同时也保障 LDAP 故障后的紧急用户登陆。 nscd 与 nslcd 两者千差万别,也将在本文章中说明其作用。
sssd 简介
sssd「System Security Services Daemon」系统安全服务后台程序是一种用于访问远程目录和身份验证机制的系统服务。该进程可以用来访问多种验证服务器,如 LDAP,Kerberos 等,并提供授权。SSSD 是介于本地用户和数据存储之间的进程,本地客户端首先连接SSSD,再由SSSD联系外部资源提供者「一台远程服务器」 系统安全服务守护进程 (SSSD) 是最初为 Linux 操作系统开发的软件,它提供一组守护进程来管理对远程目录服务和身份验证机制的访问。SSSD 起源于开源软件项目 FreeIPA(身份、政策和审计)。 SSSD 的目的是简化涉及多个不同主机的经过身份验证和授权的用户访问的系统管理。 它旨在为基于类 Unix 操作系统的网络提供单点登录功能,其效果类似于 Microsoft Active Directory 域服务向 Microsoft Windows 网络提供的功能。
在本案例中,用户认证流程是,操作系统去连接 sssd 服务,sssd 服务再去连接 LDAP 服务器进行认证。
- 避免了本地每个客户端程序对认证服务器大量连接。所有本地程序仅联系 SSSD,由 SSSD 连接认证服务器或 SSSD 缓存,有效的降低了后端服务器负载。
- 允许离线授权。SSSD 可以缓存远程服务器的用户认证身份,这允许在远程认证服务器宕机时,继续给予成功授权用户访问必要的资源。
nss-pam-ldapd 模块及其依赖
此服务为 sssd 以及 authconfig-tui 运行需要的,安装完后,nslcd 不启动,nscd 启动,且 nscd 不需要手动启动 nscd / nslcd 是两个完完全全不一样的东西
nslcd
nslcd.service - Naming services LDAP client daemon.
https://blog.csdn.net/sj349781478/article/details/109851425
The nslcd service enables you to configure your local system to load users and groups from an LDAP directory, such as Active Directory (AD).
To enable the nslcd service to load user and group information, you have to set the Unix attributes for users and groups in AD. For details, see Maintaining Unix Attributes in AD using ADUC.
nslcd「nss-pam-ldapd」本身包括了一个瘦身版本的 PAM 模块「所以 pam-ldap 就在里面了」和一个瘦身版本的 NSS 模块,但依然可以单独构建这三个部分「NSS 模块,PAM 模块和 nslcd server」,这意味着还可以使用 pam_ldap 套件和使用来自 nss-pam-slapd 套件的 NSS 模块,但目前此套件不能与 nss_ldap 套件在同一个系统中同时并行使用。
nslcd 套件的正式名称是 Daemon for NSS and PAM lookups using LDAP(nss-pam-ldapd),它最初由PADL软件公司的 Luke Howard 开发,作为 nss_ldap 的分支,名为 nss-ldapd 套件。2006年,West Consulting 的 Arthur de Jong 将这个库分成 NSS 部分和 server 部分并重写了大部分代码。当 OpenLDAP 的 nssov 模块的 Howard Chu 贡献出 PAM 代码时,这个软件被重新命名为 nss-pam-ldapd 套件。
在 RedHat 和 Debian 中此套件有不同的名称:
- CentOS: nss-pam-ldapd - An nsswitch module which uses directory servers
- Ubuntu: nslcd - Daemon for NSS and PAM lookups using LDAP
https://blog.valhalla.solutions/replace-nss-ldap-and-pam-ldap-with-nss-pam-ldapd/
长年以来 LDAP 的用法就是安装 nss_ldap 使得系统能够识别帐号,而认证机制交给 pam_ldap 负责,这在绝大多数的系统中是既定的事项,除了 Fedora 的 sssd 比较特别之外,大部分使用 LDAP 的系统管理者仍然在使用 nss_ldap + pam_ldap 的搭配。如果是有点资深的 FreeBSD 系统管理者,相信应该从 FreeBSD 7.x 一路到 10.x 来遇过不少次 nss_ldap + pam_ldap 出过意外的状况,而且每次出事都没什么人在处理,这个组合的原始码迄今也有 6 年时间没有再更新,这实在难以令人接受,不少人也因此选择冒险降级 FreeBSD 的版本。从 2014 年开始,FreeBSD 的官方讨论区里逐渐有人提到 nss-pam-ldapd,看起来只要用了 nss-pam-ldapd,那些疑难杂症全部都不见了,所以相当值得一试。
nslcd自带pam模块,因此完全不需要配置/etc/pam.d/目录下的服务,它不用ldap.conf配置文件,而使用自己的配置文件/etc/nslcd.conf配置LDAP的访问参数。而且,nslcd.conf 的预设map可以正常使用(即用RFC2307预设标准:ou=people对应用户, ou=Groups对应群组),因此,您无需在/etc/nslcd.conf文档中手工配置nss_base_passwd和nss_base_group等映射,除非您的LDAP数据库本身使用了非RFC2307标准的用户结构。
因此,要使用 nslcd 服务,还需要针对LDAP服务器进行配置, 使用 authconfig-tui 命令也会自动配置 nslcd 的配置文件(/etc/nslcd.conf)。而 nscd 只有通用的缓存定义的配置,一般情况下无需调整其配置文件(/etc/nscd.conf)。
nslcd 并没有缓存的功能,它是专门为本地处理有关 LDAP 名称服务查询的后台进程,查询结果依然由 nscd 缓存。
nscd
nscd.service - Name Service Cache Daemon
nscd 是缓存服务,会缓存三种服务 passwd group hosts,所以它会记录三个库,分别对应源 /etc/passwd, /etc/hosts 和 /etc/resolv.conf 每个库保存两份缓存,一份是找到记录的,一份是没有找到记录的。每一种缓存都保存有生存时间(TTL)。其作用就是在本 当中增加cache ,加快如DNS的解析等的速度。
所以,要清理 sssd 缓存,还需要清理 nscd 缓存,这样子系统才会重新去走一遍 LDAP 认证流程,不然就是读取的缓存,后面就无法测试 TLS 是否生效。同时,清本地的 DNS 缓存,还需要处理 nscd 的缓存。
清空各个组件的缓存条目「重启也可以」:
nscd -i passwd
nscd -i group
nscd -i hosts
- nscd 与 sssd 的纠缠
对于 nscd 与 sssd 两者都自带缓存服务,既然如此那么相互之间就会有一些影响。下方为 Redhat 官方说明原文 - 官方文档
SSSD is not designed to be used with the NSCD daemon. Even though SSSD does not directly conflict with NSCD, using both services can result in unexpected behavior, especially with how long entries are cached.

The most common evidence of a problem is conflicts with NFS. When using Network Manager to manage network connections, it may take several minutes for the network interface to come up. During this time, various services attempt to start. If these services start before the network is up and the DNS servers are available, these services fail to identify the forward or reverse DNS entries they need. These services will read an incorrect or possibly empty resolv.conf file. This file is typically only read once, and so any changes made to this file are not automatically applied. This can cause NFS locking to fail on the machine where the NSCD service is running, unless that service is manually restarted.

To avoid this problem, enable caching only for hosts in the the /etc/nscd.conf file and rely on the SSSD cache for the passwd, group, services, and netgroup entries.
Change the /etc/nscd.conf file:

enable-cache hosts yes
enable-cache passwd no
enable-cache group no
enable-cache netgroup no
enable-cache services no

With NSCD answering hosts requests, these entries will be cached by NSCD and returned by NSCD during the boot process. All other entries are handled by SSSD.
大致意思就是,sssd 不是为与 nscd 守护程序一起使用而设计的。sssd 可单独运行,但是 sssd 不与 nscd 冲突,只是两者都打开后会因为两者都有缓存导致一些奇奇怪怪的问题。这也是网上一部分人清空 sssd 缓存后,发现清理不干净的原因。 之后就是一些举例说明,当两者同时运行的时候,NFS 在系统启动时就有可能出现挂载异常,处理方案是只开放主机 hosts 缓存,其余的 passed、group、netgroup、services 缓存均使用 sssd 的缓存服务。 当然在没有缓存敏感的运行环境下,可以不修改两者缓存配置。
安装
前置条件
- 安装完 LDAP 服务端,并且保证 LDAP 服务正常可访问
- LDAP 服务端有可访问的已配置的用户与用户组设置,可用于配置完后的验证操作
开始安装
安装 rpm 包
- 基础包
yum install -y sssd
yum install -y nss-pam-ldapd
- 依赖列表
=====================================================================
Package            架构    版本                      源        大小
=====================================================================
正在安装:
sssd               x86_64  1.16.5-10.el7_9.12        updates  150 k
为依赖而安装:
GeoIP              x86_64  1.5.0-14.el7              base     1.5 M
avahi-libs         x86_64  0.6.31-20.el7             base      62 k
bind-libs          x86_64  32:9.11.4-26.P2.el7_9.9   updates  157 k
bind-libs-lite     x86_64  32:9.11.4-26.P2.el7_9.9   updates  1.1 M
bind-license       noarch  32:9.11.4-26.P2.el7_9.9   updates   91 k
bind-utils         x86_64  32:9.11.4-26.P2.el7_9.9   updates  261 k
c-ares             x86_64  1.10.0-3.el7              base      78 k
cups-libs          x86_64  1:1.6.3-51.el7            base     359 k
cyrus-sasl-gssapi  x86_64  2.1.26-24.el7_9           updates   41 k
geoipupdate        x86_64  2.5.0-1.el7               base      35 k
gnutls             x86_64  3.3.29-9.el7_6            base     680 k
http-parser        x86_64  2.7.1-9.el7               base      29 k
libbasicobjects    x86_64  0.1.1-32.el7              base      26 k
libcollection      x86_64  0.7.0-32.el7              base      42 k
libdhash           x86_64  0.5.0-32.el7              base      29 k
libini_config      x86_64  1.3.1-32.el7              base      64 k
libipa_hbac        x86_64  1.16.5-10.el7_9.12        updates  158 k
libldb             x86_64  1.5.4-2.el7               updates  149 k
libnfsidmap        x86_64  0.25-19.el7               base      50 k
libpath_utils      x86_64  0.2.1-32.el7              base      28 k
libref_array       x86_64  0.1.5-32.el7              base      27 k
libsmbclient       x86_64  4.10.16-18.el7_9          updates  146 k
libsss_autofs      x86_64  1.16.5-10.el7_9.12        updates  160 k
libsss_certmap     x86_64  1.16.5-10.el7_9.12        updates  191 k
libsss_idmap       x86_64  1.16.5-10.el7_9.12        updates  162 k
libsss_nss_idmap   x86_64  1.16.5-10.el7_9.12        updates  169 k
libsss_sudo        x86_64  1.16.5-10.el7_9.12        updates  158 k
libtalloc          x86_64  2.1.16-1.el7              base      33 k
libtdb             x86_64  1.3.18-1.el7              base      49 k
libtevent          x86_64  0.9.39-1.el7              base      41 k
libwbclient        x86_64  4.10.16-18.el7_9          updates  116 k
nettle             x86_64  2.7.1-9.el7_9             updates  328 k
python-sssdconfig  noarch  1.16.5-10.el7_9.12        updates  181 k
samba-client-libs  x86_64  4.10.16-18.el7_9          updates  5.0 M
samba-common       noarch  4.10.16-18.el7_9          updates  216 k
samba-common-libs  x86_64  4.10.16-18.el7_9          updates  182 k
sssd-ad            x86_64  1.16.5-10.el7_9.12        updates  305 k
sssd-client        x86_64  1.16.5-10.el7_9.12        updates  229 k
sssd-common        x86_64  1.16.5-10.el7_9.12        updates  1.5 M
sssd-common-pac    x86_64  1.16.5-10.el7_9.12        updates  223 k
sssd-ipa           x86_64  1.16.5-10.el7_9.12        updates  386 k
sssd-krb5          x86_64  1.16.5-10.el7_9.12        updates  192 k
sssd-krb5-common   x86_64  1.16.5-10.el7_9.12        updates  225 k
sssd-ldap          x86_64  1.16.5-10.el7_9.12        updates  285 k
sssd-proxy         x86_64  1.16.5-10.el7_9.12        updates  185 k
trousers           x86_64  0.3.14-2.el7              base     289 k
为依赖而更新:
cyrus-sasl-lib     x86_64  2.1.26-24.el7_9           updates  156 k
事务概要
=====================================================================
安装  1 软件包 (+46 依赖软件包)
升级           (  1 依赖软件包)
=====================================================================
Package           架构       版本                 源           大小
=====================================================================
正在安装:
nss-pam-ldapd     x86_64     0.8.13-25.el7        base        164 k
为依赖而安装:
nscd              x86_64     2.17-325.el7_9       updates     289 k
为依赖而更新:
glibc             x86_64     2.17-325.el7_9       updates     3.6 M
glibc-common      x86_64     2.17-325.el7_9       updates      12 M
事务概要
=====================================================================
安装  1 软件包 (+1 依赖软件包)
升级           ( 2 依赖软件包)
- 安装完后的配置文件
[root@ldap-client1 ~]# rpm -qc sssd-common-1.16.5-10.el7_9.12.x86_64
/etc/logrotate.d/sssd
/etc/pam.d/sssd-shadowutils
/etc/rwtab.d/sssd
/etc/sssd/sssd.conf # 安装完后默认是没有这个配置文件的,此配置文件生成需要下方步骤进行配置

[root@ldap-client1 ~]# rpm -qc nss-pam-ldapd
/etc/nslcd.conf # 安装完后默认是没有这个配置文件的,此配置文件生成需要下方步骤进行配置
/usr/lib/systemd/system/nslcd.service
/usr/lib/tmpfiles.d/nss-pam-ldapd.conf

[root@ldap-client1 ~]# rpm -qc nscd
/etc/nscd.conf
/etc/sysconfig/nscd
配置 /etc/sssd/sssd.conf 与 /etc/nslcd.conf
安装完 sssd 后是没有 sssd.conf 和 nslcd.conf 配置文件的,需要通过 authconfig-tui 配置工具生成。
- 使用 authconfig-tui 配置工具进行配置
authconfig-tui # 按照提示填入参数即可
- 通过 authconfig-tui 配置工具生成的配置
/etc/sssd/sssd.conf
[domain/default]
autofs_provider = ldap
cache_credentials = False
#krb5_realm = EXAMPLE.COM
ldap_search_base = dc=expwd,dc=com
#krb5_server = ipa-server.example.com:88
id_provider = ldap
auth_provider = ldap
chpass_provider = ldap
ldap_uri = ldap://192.168.2.137/
ldap_id_use_start_tls = False
ldap_tls_cacertdir = /etc/openldap/cacerts
ldap_tls_reqcert = never
略
配置 /etc/nsswitch.conf
在 CentOS 下会自动完成配置,不需要手动修改
配置 pam 参数
在 pam 内配置上 pam_sss.so 的认证配置即可
https://wiki.koozali.org/Client_Authentication:Centos_via_sssd/ldap#Configure_pam https://support.datafabric.hpe.com/s/article/How-to-configure-LDAP-client-by-using-SSSD-for-authentication-on-CentOS?language=en_US
password-auth
#%PAM-1.0
# This file is auto-generated.
# User changes will be destroyed the next time authconfig is run.
auth        required      pam_env.so
auth        required      pam_faildelay.so delay=2000000
auth        [default=1 ignore=ignore success=ok] pam_succeed_if.so uid >= 1000 quiet
auth        [default=1 ignore=ignore success=ok] pam_localuser.so
auth        sufficient    pam_unix.so nullok try_first_pass
auth        requisite     pam_succeed_if.so uid >= 1000 quiet_success
##### auth        sufficient    pam_sss.so forward_pass
auth        required      pam_deny.so

account     required      pam_unix.so broken_shadow
account     sufficient    pam_localuser.so
account     sufficient    pam_succeed_if.so uid < 1000 quiet
##### account     [default=bad success=ok user_unknown=ignore] pam_sss.so
account     required      pam_permit.so

password    requisite     pam_pwquality.so try_first_pass local_users_only retry=3 authtok_type=
password    sufficient    pam_unix.so md5 shadow nullok try_first_pass use_authtok
##### password    sufficient    pam_sss.so use_authtok


password    required      pam_deny.so

session     optional      pam_keyinit.so revoke
session     required      pam_limits.so
-session     optional      pam_systemd.so
session     [success=1 default=ignore] pam_succeed_if.so service in crond quiet use_uid
session     required      pam_unix.so
##### session     optional      pam_sss.so
system-auth
#%PAM-1.0
# This file is auto-generated.
# User changes will be destroyed the next time authconfig is run.
auth        required      pam_env.so
auth        required      pam_faildelay.so delay=2000000
auth        [default=1 ignore=ignore success=ok] pam_succeed_if.so uid >= 1000 quiet
auth        [default=1 ignore=ignore success=ok] pam_localuser.so
auth        sufficient    pam_unix.so nullok try_first_pass
auth        requisite     pam_succeed_if.so uid >= 1000 quiet_success
##### auth        sufficient    pam_sss.so forward_pass
auth        required      pam_deny.so

account     required      pam_unix.so broken_shadow
account     sufficient    pam_localuser.so
account     sufficient    pam_succeed_if.so uid < 1000 quiet
##### account     [default=bad success=ok user_unknown=ignore] pam_sss.so
account     required      pam_permit.so

password    requisite     pam_pwquality.so try_first_pass local_users_only retry=3 authtok_type=
password    sufficient    pam_unix.so md5 shadow nullok try_first_pass use_authtok
##### password    sufficient    pam_sss.so use_authtok
password    required      pam_deny.so

session     optional      pam_keyinit.so revoke
session     required      pam_limits.so
-session     optional      pam_systemd.so
session     [success=1 default=ignore] pam_succeed_if.so service in crond quiet use_uid
session     required      pam_unix.so
##### session     optional      pam_sss.so
ssh「添加最后一行,session required pam_mkhomedir.so 当家目录不存在时自动创建」
#%PAM-1.0
auth       required     pam_sepermit.so
auth       substack     password-auth
auth       include      postlogin
# Used with polkit to reauthorize users in remote sessions
-auth      optional     pam_reauthorize.so prepare
account    required     pam_nologin.so
account    include      password-auth
password   include      password-auth
# pam_selinux.so close should be the first session rule
session    required     pam_selinux.so close
session    required     pam_loginuid.so
# pam_selinux.so open should only be followed by sessions to be executed in the user context
session    required     pam_selinux.so open env_params
session    required     pam_namespace.so
session    optional     pam_keyinit.so force revoke
session    include      password-auth
session    include      postlogin
# Used with polkit to reauthorize users in remote sessions
-session   optional     pam_reauthorize.so prepare
##### session    required     pam_mkhomedir.so
启动生效
systemctl restart sshd sssd
验证
附录
- 一些尝试
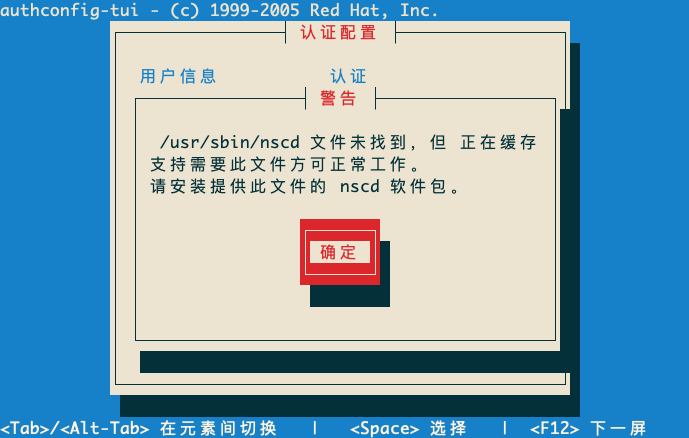
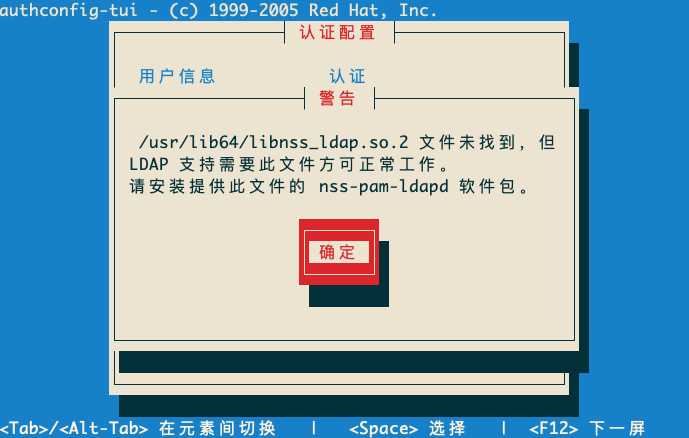
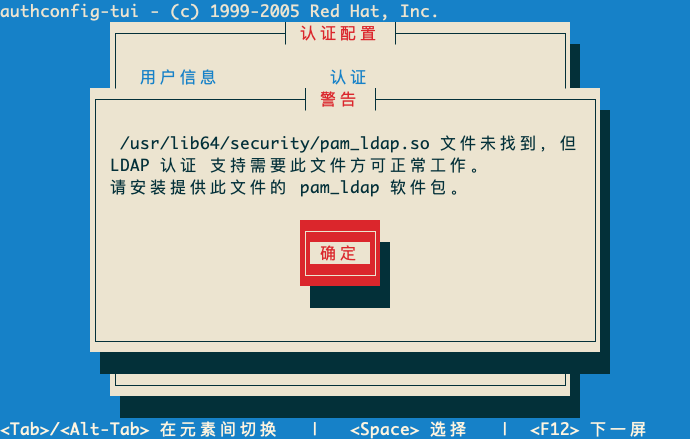
如果软件包不安装,那么会在
authconfig-tui配置过程中,出现如下报错
- nscd 未安装


- nss-pam-ldapd 未安装,pam-ldap 组建包含在 nss-pam-ldapd 里了,所以可以一并解决


在配置完后还会报错
[root@localhost ~]# authconfig-tui
authconfig-tui: Authentication module /usr/lib64/security/pam_ldap.so is missing. Authentication process might not work correctly.
Failed to start nscd.service: Unit not found.
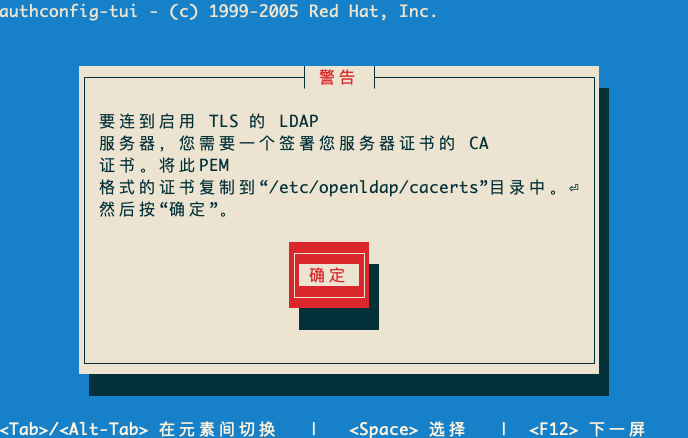
- 一些截图
authconfig-tui配置过程中,会提示 CA 文件放置的位置


- we
参考资料
「Openldap安装部署」 https://www.cnblogs.com/swordfall/p/12119010.html#auto_id_20 「SSSD连接LDAP配置」👍 https://www.jianshu.com/p/8accfdb33725 「wbwangk/wbwangk.github.io - SSSD」 https://github.com/wbwangk/wbwangk.github.io/wiki/SSSD 「wbwangk/wbwangk.github.io - NSLCD」 https://github.com/wbwangk/wbwangk.github.io/wiki/NSLCD 「13.2.28. MANAGING THE SSSD CACHE」 https://access.redhat.com/documentation/en-us/red_hat_enterprise_linux/6/html/deployment_guide/sssd-cache 「2.7. 使用 SSSD 自动创建用户私有组」 https://access.redhat.com/documentation/zh-cn/red_hat_enterprise_linux/7/html/windows_integration_guide/gid-for-ad-users 「CONFIGURING SYSTEM SERVICES FOR SSSD」👍 https://access.redhat.com/documentation/en-us/red_hat_enterprise_linux/7/html/system-level_authentication_guide/configuring_services 「Configuring Sudo using SSSD」 https://serverfault.com/questions/946500/configuring-sudo-using-sssd
