👌 2020-01-15 PXE 预启动环境安装 - Legacy 传统引导环境
FileInfo Filename - PXE Legacy Boot Configure Guide.md Version - v1.3.2001(2020/01/13 ~ 2020/01/28) Author - standuke Email - shadowdoker@gmail.com DescriptionKey - PXE Boot with multi-system Configure Guide
本文约定
在文中将有以下提示符对重点进行标注说明,请注意文中提示。
⚠️ - 文中出现此标记,代表重要提示,指需要格外注意的地方 🔘 - 文中出现此标记,代表可选配置,建议配置,但不必要 ✅ - 文中出现此标记,代表检查项目,需要检查对应的配置文件 ❗️ - 文中出现此标记,代表该操作不可随意修改,如更改此步操作,请预先测试
PXE 简介
PXE ( Preboot Excution Environment ) 预启动执行环境,由 Intel 公司研发基于 Client/Server 的网络模式,远程主机可通过网络从远端服务器下载系统映像,并由此支持通过网络启动操作系统。PXE 可以引导和安装 Windows,Linux 等多种操作系统。 ⚠️ PXE 网络自动化安装需要搭建如下三类系统服务。
- DHCP 服务器: 提供 IP 地址,tftp 位置
- 网络系统镜像 YUM 源( HTTP、FTP、NFS 三选一 ): 提供系统安装文件
- tftp 服务器: 提供 bootloader 以及内核作为启动引导
⚠️ PXE 所使用的核心文件有以下几个。
- vmlinuz: 核心文件(kernel file)
- initrd.img: 开启过程中核心组件的参数
- isolinux.cfg –> demo: 开机 PXE 选择参考
原理: 由 DHCP 服务器,使服务器启动时,获取到自分配 IP,在 DHCP 配置中指定了参数 next-Server,该 next-Server 指向 tftp 服务器的 IP。如此机器获取到 IP 后,会从指定的 tftp 服务器的默认路径
/var/lib/tftpboot下去下载相关的文件. 首先是加载 PXELinux.cfg 目录下的 default 文件,该 default 文件就是安装机器的菜单选项,在这菜单里,指定 Kickstart 文件路径和/var/lib/tftpboot下的 initrd.img 和 vmlinuz 的路径,使得需要安装的对应系统能够启动并加载 kickstart 文件进行安装。安装包的路径在 kickstart 文件中指定。
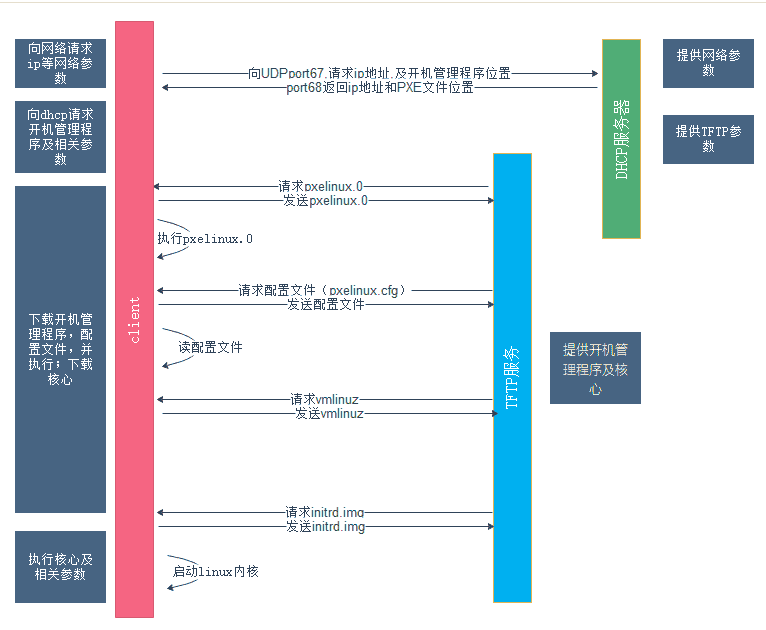
⚠️ 注意:全程使用为 UDP 封装,图中部分箭头指向方位有误
- Client 向 PXE Server 上的 DHCP 发送 IP 地址请求消息,DHCP 检测 Client 是否合法,同时将 PXE 环境下的 boot loader 文件 PXElinux.0 的位置信息发给 Client
- Client 向 PXE Server 上的 tftp 请求 PXELinux.0,tftp 收到消息向 Client发送 PXELinux.0大小信息,试探 Client 是否满意,当 tftp 收到 Client 发回的统一大小信息后,发送 PXELinux.0.
- Client 执行接收到的 PXELinux.0
- Client 向 tftp 请求 PXELinux.cfg 文件(其实是目录,里面放了启动菜单,即 grub 的配置文件),tftp 将配置文件发回 Client,继而 Client 根据配置文件执行后续的操作
- Client 向 tftp 发送 Linux 内核请求信息,tftp 发送内核
- Client 向 tftp 发送根文件请求信息, tftp 接受到消息之后返回 Linux 根文件系统
- Client 加载 Linux 内核(启动参数已经在4中的配置文件中设置好了)。
- Client 通过 nfs/ftp/http 下载系统安装文件进行安装,如果4中的配置文件指定了 Kickstart 路径,则回根据此文件自动应答安装系统
基础环境准备
PXE 基础操作系统环境
- 操作系统 CentOS 7.7 (Minimal Install 最小化安装)
- 本地 YUM 源
- 建议网络速率千兆以上
- ❗️关闭并禁止开机自启如下服务:系统防火墙(
Firewalld、iptables) - ❗️关闭并禁用
SELinux - ❗️PXE环境下 DHCP 服务仅能当前 PXE 服务器提供,⚠️ 注意检查环境内是否有另外的 DHCP 服务干扰
开始安装
大致部署顺序为:DHCP、部署 HTTP、tftp、提供 bootloader 及配置文件、挂载光盘,把内核文件 cp 到 tftp 目录,并放置文件、设置菜单及提供系统安装文件。
1. DHCP 服务器
DHCP 服务器向待安装服务器分配 IP 地址,同时指定 tftp 服务器的地址,以让服务器在获得 IP 地址后可前往 tftp 获取 bootloader 文件。
安装 DHCP 服务
yum install -y dhcp
修改 DHCP 服务配置(vi /etc/dhcp/dhcp.conf)默认 DHCP 配置文件为空
# 设置子网
subnet 192.168.16.0 netmask 255.255.255.0 {
  range 192.168.16.2 192.168.16.249;
  option subnet-mask 255.255.255.0;
  option routers 192.168.16.254;
  # tftp 地址以及 pxelinux.0 的 bootloader 文件
  next-server 192.168.16.1;
  filename "pxelinux.0";
  # 以下是子网可选配置
  option domain-name-servers 192.168.16.250;
  default-lease-time 600;
  max-lease-time 7200;
}

# 以下全局配置可选:可用 MAC 绑定某台主机 IP 地址
host clientA{
        hardware ethernet 00:00:00:00:00:AB;
        fixed-address 192.168.16.249;
}
ddns-update-style interim;
⚠️ 若出现 No subnet declaration for eth 则需要排查如下事项
- DHCP 报错提示的 eth 网卡若已有 IP 地址则其网段必须与 DHCP 配置文件在同一网段(即 eth 网段与 DHCP 网段相同)。
- 若 eth 网卡未分配有 IP 地址或未开启,请务必先开启并手动分配,同时确保为 static 的方式启动,才能启动 dhcpd 服务。
- 使用 Vmware 虚拟机时,需要注意 DHCP 配置的 subnet 在 eth0 网卡 IP 所在网段,并且 eth0 不能是 hostonly,可以是桥接模式或 NAT 模式。和「1」相同,也是网段问题。
启动 DHCP 服务
# 如有需要可设置开机自启
systemctl start dhcpd && systemctl enable dhcpd
验证
可使用 dhclient 工具测试 DHCP 服务,亦可查看 IP 租约信息
cat /var/lib/dhcpd/dhcpd.leases
2. 网络系统镜像 YUM 源( HTTP、FTP、NFS 三选一 )
在本文中建议使用 HTTP 作为系统 YUM 的提供方式,一个是作为 PXE 安装使用,另一个可作为系统安装完成后的系统本地 YUM 源使用,同时也可以在该台 HTTP 服务器上提供多个系统版本的 YUM 源。
HTTP
安装 HTTP 服务
yum install -y httpd
添加系统光盘镜像,⚠️ 可添加多个安装光盘,HTTP 服务默认把 /var/www/html 作为文件网站根目录
# 默认将系统 OS 安装光盘上传至文件夹 /opt/mirror 可安装 lrzsz 用于上传文件
mkdir -p /opt/mirror && cd /opt/mirror && rz $OS_VERSION
# 设置开机自动挂载至文件夹 /var/www/html/$OS_VERSION
mkdir -p /var/www/html/centos77 && vi /etc/fstab
# 文件末尾添加自动挂载配置
/opt/mirror/centos77.iso /var/www/html/centos77 iso9660 defaults 0 0
# 挂载镜像文件,并检查
mount -a && ls /var/www/html/centos77
🔘 配置 HTTP 服务,设置 ~/var/www/html/$OS_VERSION 文件夹浏览器可目录展示
# 若如上配置完毕,此处无需修改
# 开启 autoindex 模块,默认为开启状态,注意检查
# 若配置为其他文件夹作为 HTTP YUM 提供目录,则需要配置对应目录,默认是不需要配置的,配置时注意文件夹访问权限
启动 HTTP 服务同时设置开机自启
systemctl start httpd && systemctl enable httpd
验证 浏览器访问: http://localhost/centos77
3. tftp 服务器
安装 tftp 访问
# tftp 是由 xinetd 这个 super daemon 所管理的
# 因此要安装 xinetd,同时设定好 tftp 之后,要启动的是 xinetd;
yum install tftp-server xinetd
启用 tftp
vi /etc/xinetd.d/tftp
# 修改其中参数,yes 改为 no,以启用 tftp
disable = no
# ⚠️ 以下是 tftp 的根目录
server_args = -s /var/lib/tftpboot
启动 tftp
systemctl start tftp && systemctl enable tftp
检验
# 安装 tftp 客户端
yum install -y tftp
# 在 tftp 的根目录创建文件
cd /var/lib/tftpboot && touch test
# 本地测试连接是否可访问且可下载文件
cd ~ && tftp localhost
# 以下命令在 tftp 客户端输入
tftp>get test
tftp>quit
# 查看当前目录是否有刚才下载的 `test` 文件
4. 制作 bootloader 及配置文件
- 创建 pxelinux.cfg 启动配置文件夹
mkdir /var/lib/tftpboot/pxelinux.cfg
⚠️ pxelinux.cfg 是个目录,可以放置默认的开机选项,也可以针对不同的客户端主机提供不同的开机选项。可以在 pxelinux.cfg 目录内建立一个名为 default 的文件来提供默认选项。
- 准备启动菜单,复制 系统安装光盘 下的
isolinux.cfg文件,作为默认菜单文件
cp /$SYSTEM_ISO_MIRROR/isolinux/isolinux.cfg /var/lib/tftpboot/pxelinux.cfg/default
⚠️ isolinux.cfg 文件为系统启动菜单
- 准备 bootloader 及配置文件
# bootloader 所需文件由 syslinux 软件包提供,这里不建议从系统镜像中获得 bootloader
yum install -y syslinux
# 从 syslinux 复制几个启动文件至 tftp 根目录
cp -a /usr/share/syslinux/{menu.c32,vesamenu.c32,pxelinux.0} /var/lib/tftpboot
⚠️ pxelinux.0 为启动操作系统的文件;menu.c32 这个是菜单风格;vesamenu.c32 这个是图像风格
- 准备计算机启动所需的内核文件和虚拟根文件
cp/misc/cd/isolinux/{vmlinuz,initrd.img} /var/lib/tftpboot/
- ❗️ 最后文件结构为
tree /var/lib/tftpboot
|__initrd.img # 虚拟根文件
|__menu.32c # 菜单风格
|__pexlinux.0 # 启动操作系统的文件
|__pxelinux.cfg # 放置默认的开机选项
|  |__default # 即 isolinux.cfg 系统启动菜单
|__vesamenu.32c # 图像风格
|__vmlinuz # 内核文件
- ❗️ default 文件配置修改,需添加或修改成如下内容
label linux
  menu label^Install CentOS 7
  menu default
  kernel vmlinuz
  append initrd=initrd.img inst.repo=http://192.168.16.1/centos77 inst.ks=http://192.168.16.1/ks.cfg quiet
- ❗️ ks 文件配置修改
cdrom
# 改为
url --url="http://192.168.16.1/centos77"
5. 光盘部分文件介绍
isolinux/boot.cat:这个文件作用是类型MBR(Main Boot Record),负责磁盘操作系统(DOS)对磁盘进行读写时分区合法性的判别、分区引导信息的定位,启动的stage1.
isolinux/isolinux.bin,负责光盘的stage2,也是二进制文件,作用类似grub的第二阶段
isolinuz/vmlinuz:是linux的内核,相当于是一个小的linux系统
isolinuz/initrd.img,一般被用来临时的引导硬件到实际内核vmlinuz能够接管并继续引导的状态
isolinux/isolinux.cfg:这个是光盘启动时的菜单文件,菜单的风格是文件vesamenu.c32.在isolinux.cfg里有调用,该文件里还指定了内核isolinuz/vmlinuz和isolinuz/initrd.img的路径,向内核传递参数:append initrd=initrd.img,这段参数可以自己定制,如在后面加text,就会实现字符界面安装,这个用于自动化安装,不适合于手动安装,鼠标点不了的。字符界面一般用于自动化安装。
在isolinux.cfg文件中指明kickstart文件的位置,有以下几个路径进行调用该文件,写法如下
DVD drive:ks=cdrom:/PATH/TO/KICKSTART_FILE
Hard drive:ks=hd:device:/directory/KICKSTART_FILE
HTTP server:ks=http://host:port/path/to/KICKSTART_FILE
FTP server:ks=ftp://host:port/path/to/KICKSTART_FILE
HTTPS server:ks=https://host:port/path/to/KICKSTART_FILE
NFSserver:ks=nfs:host:/path/to/KICKSTART_FILE
详细可见: https://blog.51cto.com/ghbsunny/1969593
6. ks(Kickstart)文件
如下为系统默认 最小化安装 时的 ks 文件(anaconda-ks.cfg)
#version=DEVEL
# System authorization information
auth --enableshadow --passalgo=sha512
# Use CDROM installation media
cdrom
# Use graphical install
graphical
# Run the Setup Agent on first boot
firstboot --enable

# Keyboard layouts
keyboard --vckeymap=us --xlayouts='us'
# System language
lang en_US.UTF-8

# Network information
network  --bootproto=dhcp --device=enp0s3 --onboot=off --ipv6=auto --no-activate
network  --hostname=localhost.localdomain

# Root password
rootpw --plaintext 123456
# System services
services --disabled="chronyd"
# System timezone
timezone Asia/Shanghai --isUtc --nontp
# System bootloader configuration
bootloader --location=mbr --boot-drive=sda
autopart --type=lvm
# Partition clearing information
clearpart --none --initlabel

%packages
@^minimal
@core

%end

%addon com_redhat_kdump --disable --reserve-mb='auto'

%end

%anaconda
pwpolicy root --minlen=6 --minquality=1 --notstrict --nochanges --notempty
pwpolicy user --minlen=6 --minquality=1 --notstrict --nochanges --emptyok
pwpolicy luks --minlen=6 --minquality=1 --notstrict --nochanges --notempty
%end
如下为建议使用的 ks 文件(请自行创建)
#platform=x86, AMD64, or Intel EM64T
#version=DEVEL
# Install OS instead of upgrade
install
# Keyboard layouts
keyboard 'us'
# Root password
rootpw --plaintext 123456
# System language
lang en_US
# System authorization information
auth  --useshadow  --passalgo=sha512
# Use text mode install
text
# SELinux configuration
selinux --disabled
# Do not configure the X Window System
skipx

# Firewall configuration
firewall --disabled
# Reboot after installation
reboot
# System timezone
timezone Asia/Shanghai
# Use network installation
url --url="http://192.168.16.1/centos77"
# System bootloader configuration
bootloader --location=mbr
# Clear the Master Boot Record
zerombr
# Partition clearing information
clearpart --all --initlabel
# Disk partitioning information
part /boot --fstype="xfs" --ondisk=sda --size=1024

%packages
@^minimal
@core
%end
%addon com_redhat_kdump --disable --reserve-mb='auto'
%post
PS1='  \[\033[0;33m\]>\u \[\033[0;37m\]\w\n\[\033[1;32m\][\h]\[\033[01;31m\]\$ \[\033[00m\]'
yum install -y wget unzip ethtool git bind-utils sysstat iptraf lsof tmux tree lrzsz vim man-pages bash-completion dos2unix
%end
一键 PXE
#!/bin/bash
restart_DHCPd() {
service DHCPd restart &>/dev/null;
chkconfig DHCPd on &>/dev/null;
}
restart_tftp () {
sed -i 's/disable.*/disble = no/g' /etc/xinetd.d/tftp &>/dev/null;
chkconfig tftp on &>/dev/null;
service xinetd restart &>/dev/null;
}
restart_httpd(){
service httpd restart &>/dev/null;
chkconfig httpd on &>/dev/null;
}
min_time () {
time=`date +%Y%m%d%H%M`
}
ip=$(ifconfig  | awk '/inet /{print $2}'| awk -F : '{print $NF}'| head -1)
min_time;
#install Server
echo "Now install DHCP,http,tftp Server and tftp Client,it might take few minites"
rpm -q httpd &>/dev/null && restart_httpd || { yum -y install httpd &>/dev/null;restart_httpd; }
rpm -q DHCP &>/dev/null && restart_DHCPd ||  { yum -y install DHCP&>/dev/null;restart_DHCPd; }
rpm -q tftp-Server &>/dev/null && restart_tftp  || { yum -y install tftp-Server &>/dev/null;restart_tftp; }
rpm -q tftp &>/dev/null || yum -y install tftp &>/dev/null;
#For centos 6.9,file PXELinux.0 comes from packges sysLinux-nonLinux,other version is from sysLinux,but if you install packge sysLinux,it will also install sysLinux-nonLinux packge,so just install sysLinux packge is OK to get file sysLinux-nonLinux.
rpm -q sysLinux &>/dev/null || yum -y install sysLinux &>/dev/null;
#set http for yum Server
#mount yum source
echo "Now you need to config  yum Server in http Server"
echo "Since I do not know which different disc your disc will be displayed,such as,centos7 display as /dev/sr0,or display as/dev/sr1 or other device "
echo "This time,I have three disks,6i386 means 386 arch for ceentos6.5,6x86_64 means 64bit for centos6.9,7 means centos7.3"
echo "the relation of my disk  dislay in the centos as below"
echo -e "/dev/sr0 ---> 6x86_64 \n/dev/sr1 ---> 6i386 \n/dev/sr2 ---> 7"
mkdir -p /var/www/html/os/{6i386,6x86_64,7}
read -p "Would you want to mount disk auto:(eg:y/n): " automount
case $automount in
y)
echo -e "/dev/sr0 ---> 6x86_64 \n/dev/sr1 ---> 6i386 \n/dev/sr2 ---> 7"
mount /dev/sr0   /var/www/html/os/6x86_64
mount /dev/sr1   /var/www/html/os/6i386
mount /dev/sr2   /var/www/html/os/7
;;
*)
echo "Since your answer is no or other,please mount disk after the script end"
echo "eg: run    mount /dev/sr0   /var/www/html/os/6x86_64  "
echo "eg: if your want to mount the disk fixed,please write to /etc/fstab,eg: /dev/sr0        /var/www/html/os/6x86_64      iso9660    defaults        0 0 "
;;
esac
#prepare ks file in /var/www/html/ksdir
echo "If your have put ks file in other hosts,your should input remote ,and input the remote file full path,and it will use scp ⌘ to copy the ks file directory to /var/www/html/ksdir"
echo "If you put dir in local host,input local,it will will cp ⌘ to  copy the ks file directory to /var/www/html/ksdir"
echo "if you input any other,you should cp ksdir to /var/www/html/ksdir"
read -p "Do you want to copy remote ks dir( r (remote) or l (local) or any other input ): " ifcopy
mkdir -p /var/www/html/ksdir/
case $ifcopy in
r|remote)
read -p "input the remote ksdir directory(defaults:root@172.18.50.75:/var/www/html/ksdir/*): " ksdir
if [ -z ${ksdir:-} ];then
ksdir="root@172.18.50.75:/var/www/html/ksdir/*"
fi
read -p "input host user's password you have put: " passwd
expect -c "
spawn  scp  $ksdir /var/www/html/ksdir/
expect {
\"*assword\" {set timeout 300; send \"$passwd\r\"; }
\"yes/no\" { send \"yes\r\"; exp_continue; }
}
expect eof"
ls /var/www/html/ksdir | while read ksfile; do
sed -i "s@url --url=\"http://.*/os/@url --url=\"http://$ip/os/@g"  /var/www/html/ksdir/$ksfile
done
;;
l|local )
read -p "Please input your local ks directory(eg:/root/ksdir/*): " ksdir
cp $ksdir /var/www/html/ksdir/
;;
*)
echo "your input is wrong,please manual copy ksdir to /var/www/html/ksdir/"
;;
esac
#config DHCP
echo "Now config DHCP Server..."
read -p "Input your next-Server ip(default is your host ip): " nextip
if [ -z ${nextip:-} ];then
nextip="$ip"
fi
echo nextip is "$nextip"
mv /etc/DHCP/DHCPd.conf /etc/DHCP/DHCPd.conf."$time".bak
cat >/etc/DHCP/DHCPd.conf<
option domain-name "sunny.com";
option domain-name-Servers 192.168.32.61;
default-lease-time 86400;
max-lease-time 86400;
subnet 192.168.32.0 netmask 255.255.255.0 {
range 192.168.32.100 192.168.32.200;
option routers 192.168.32.1;
next-Server $nextip;
filename "PXELinux.0";
}
log-facility local7;
eof
echo "As default,the DHCP Server will alocate ip 192.168.32.100--192.168.32.200,dns Server is 192.168.32.61,router is 192.168.32.1,if you want to change these config ,please run 'vim /etc/DHCP/DHCPd.conf' to change /etc/DHCP/DHCPd.conf"
echo "DHCP is complete config now"
#config tltp
echo "If you want to copy Linux kernel file to /var/lib/tftpboot/{6i386,6x86_64,7}"
read -p "Please input m(means manual) or a (means auto): " copyfile
case $copyfile in
a)
mkdir -p /var/lib/tftpboot/{6i386,6x86_64,7}
cp /var/www/html/os/6i386/isoLinux/{initrd.img,vmlinuz} /var/lib/tftpboot/6i386
cp /var/www/html/os/6x86_64/isoLinux/{initrd.img,vmlinuz} /var/lib/tftpboot/6x86_64
cp /var/www/html/os/7/isoLinux/{initrd.img,vmlinuz}   /var/lib/tftpboot/7
;;
*)
echo "Your input is m or other things"
echo "you should do two things after the scripts"
echo "create directory under /var/lib/tftpboot/,such as mkdir /var/lib/tftpboot/6i386"
echo "copy the kernel file to the relative dir,such as cp /var/www/html/os/6i386/isoLinux/{initrd.img,vmlinuz} /var/lib/tftpboot/6i386"
echo "If you hve many other yum source,please create relative dir under /var/lib/tftpboot/6i386"
;;
esac
cp /usr/share/sysLinux/{PXELinux.0,menu.c32} /var/lib/tftpboot/
echo "Now config defaults file ,you can copy the host relative disk file ,/media/isoLinux/isoLinux.cfg to /var/lib/tftpboot/PXELinux.cfg,and rename it to defaults,and the modify the config,run ⌘ 'cp /media/isoLinux/isoLinux.cfg /var/lib/tftpboot/    PXELinux.cfg/default' "
echo "Now I will config /var/lib/tftpboot/PXELinux.cfg/default"
mkdir  /var/lib/tftpboot/PXELinux.cfg
cat > /var/lib/tftpboot/PXELinux.cfg/default<
default menu.c32
#prompt 1
timeout 80
display boot.msg
menu background splash.jpg
menu title Welcome to Sunny diy install Linux!
menu color border 0 #ffffffff #00000000
menu color sel 7 #ffffffff #ff000000
menu color title 0 #ffffffff #00000000
menu color tabmsg 0 #ffffffff #00000000
menu color unsel 0 #ffffffff #00000000
menu color hotsel 0 #ff000000 #ffffffff
menu color hotkey 7 #ffffffff #ff000000
menu color scrollbar 0 #ffffffff #00000000
label desktop73
menu label Install diy ^desktop centos 7
menu default
kernel 7/vmlinuz
append initrd=7/initrd.img ks=http://$ip/ksdir/ks73desk.cfg
label mini73
menu label Install diy ^mini centos 7
menu default
kernel 7/vmlinuz
append initrd=7/initrd.img ks=http://$ip/ksdir/ks73min.cfg
label desktop6.5
menu label Installed d^esktop centos 6.5 i386
kernel 6i386/vmlinuz
append initrd=6i386/initrd.img ks=http://$ip/ksdir/ks65desk.cfg
label mini6.5
menu label Install m^ini centos 6.5 i386
kernel 6i386/vmlinuz
append initrd=6i386/initrd.img ks=http://$ip/ksdir/ks65min.cfg
label desktop6.9
menu label Installed de^sktop centos 6.9
kernel 6x86_64/vmlinuz
append initrd=6x86_64/initrd.img ks=http://$ip/ksdir/ks69desk.cfg
label mini6.9
menu label Install mi^ni centos 6.9
kernel 6x86_64/vmlinuz
append initrd=6x86_64/initrd.img ks=http://$ip/ksdir/ks69min.cfg
eof
echo "tftp is config OK"
#restart Server
echo "now restart Server"
restart_httpd;
restart_tftp;
restart_DHCPd;
netstat -ntulp | grep DHCPd | grep :67 &>/dev/null && echo "DHCP is running..." || echo "DHCP is not run,please check"
netstat -ntulp | grep httpd | grep :80 &>/dev/null && echo "http is running..." || echo "http is not run,please check"
netstat -ntulp | grep xinetd | grep 69 &>/dev/null && echo "tftp is running..." || echo "tftp is not run,please check"
安装校验及注意事项
- PXE 服务开机自启
- ⚠️ 当需要安装的服务器自动安装完毕后记得关闭 PXE 服务,因为万一出现业务系统服务器开机找不到系统,自动从 PXE 引导,会被重新安装操作系统(从 PXE 到跑路……)
- 因安装时关闭了系统防火墙,如有需要,请重新开启
- 因安装需要配置的 DHCP 服务,很大程度上在之后的业务中并不会使用 PXE 的 DHCP 服务,注意检查或关闭此 DHCP 服务
- 使用 PXE 自动化安装系统,最小内存要求为 2GB,使用虚拟机部署请注意
修订信息
| 版本号 | 修订日期 | 修订人 | 备注 |
|---|---|---|---|
| v1.1.2001 | 2020-01-13 | NUO | 建立文档 |
| v1.2.2001 | 2020-01-16 | NUO | 更新 ks 文件 |
| v1.3.2001 | 2020-01-28 | NUO | 更新光盘文件说明 |